


You’ve carefully selected your route through the Drakensberg, packed your essentials, and laced up your boots—but have you given the same attention to how your backpack fits? A poorly fitted backpack can transform an epic adventure into a painful ordeal, causing everything from shoulder strain to lower back pain that’ll torment you long after you’ve returned home.
The difference between a memorable hiking experience and a miserable slog often comes down to one factor: backpack fit. South African adventurers tackling everything from Table Mountain day hikes to multi-day Drakensberg expeditions need gear that works with their body, not against it. Poor fit doesn’t just cause discomfort. It can actually lead to serious injury and cut your adventure short.
Key Takeaways
- The 20% rule: Never carry more than 20% of your body weight to maintain comfort and prevent injury.
- Torso length matters most: Your torso measurement, not your height, determines the right backpack size
- Hips do the heavy lifting: A properly positioned hip belt should carry 70-80% of your pack’s weight
- Fit indicators: Good fit means no pressure points, balanced weight distribution, and freedom of movement
How Much Should Your Backpack Weigh and Is the 20% Rule Always Right?
The traditional 20% rule suggests your backpack shouldn’t exceed 20% of your body weight. However, recent research shows this guideline may not apply equally to all hikers. Your individual carrying capacity depends on multiple factors, including fitness level, body composition, trip duration, and terrain difficulty.
The 20% rule provides a useful starting point for backpack weight management. For a 70kg hiker, this translates to a maximum pack weight of 14kg, including water and food. This guideline helps prevent the excessive stress on your spine, joints, and muscles that leads to fatigue and injury.
However, recent studies suggest that hikers who weigh less should be able to carry more weight in their backpacks, compared to heavier hikers, because the total weight (body plus pack) remains lower overall. Research published by a Kansas State University physics professor found that as hikers get bigger, the weight of the load they’re able to carry actually decreases when considering total system weight.
This means a lighter hiker might safely carry more than 20% of their body weight, while heavier hikers should ideally stay closer to the 15-20% mark. Your fitness level, hiking experience, and the specific demands of South African terrain all influence these calculations.
Additional Factors to Consider
South Africa’s diverse hiking environments add another layer of complexity. The technical scrambles on Table Mountain’s routes or the multi-day challenges of the Drakensberg require different weight strategies than gentle coastal walks. Beginners should start conservatively at 15-18% while building experience and strength.
Consider trip duration too. Day hikes allow for slightly heavier loads since you’re not carrying them for multiple days. Multi-day expeditions benefit from lighter packs to prevent cumulative fatigue and maintain enjoyment throughout your adventure.
Measuring for the Right Fit: Torso and Hip Size
How do you measure for the correct backpack size? Start with your torso length, measured from your C7 vertebra to the top of your hip bones. This measurement, not your overall height, determines which size backpack you need.
To find your C7 vertebra, tilt your head forward—it’s the prominent bone at the base of your neck. Have someone help you measure from this point straight down to your iliac crest (the top of your hip bones). Most people fall into these categories:
| Torso Length | Backpack Size | Typical Height Range |
| 38-43cm | Small | 1.5-1.65m |
| 43-48cm | Medium | 1.65-1.8m |
| 48-53cm | Large | 1.8m+ |
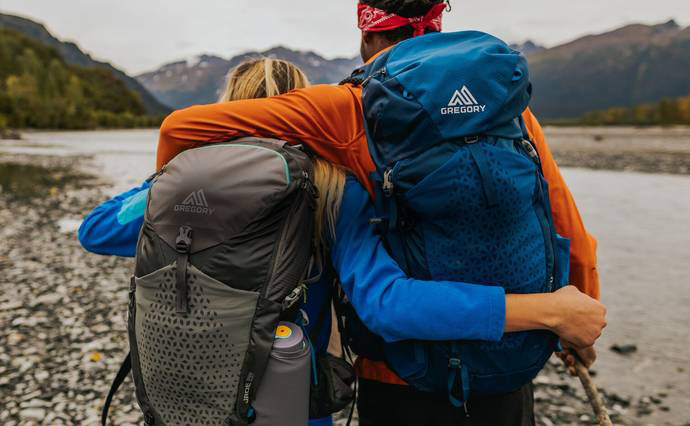
Hip circumference is equally important. Measure around your iliac crest, not your waist. This determines hip belt size and affects how weight transfers from the pack to your body. The hip belt is your backpack’s most important component—it’s where 70-80% of the weight should rest.
Many quality backpacks feature adjustable torso lengths, allowing fine-tuning between standard sizes. This adjustability can make the difference between a good fit and a perfect one, especially for hikers whose measurements fall between standard sizes.
Embed video: https://youtu.be/iCG6C_a5NIE?si=fblbUAs8d_SyNYX3
Where Should a Backpack Sit on Your Hips?
Where exactly should your backpack’s hip belt sit? The hip belt must rest on your iliac crest—the bony ridge at the top of your hips—not on your waist or lower back. This positioning ensures optimal weight distribution and prevents the pack from pulling you backwards.
The iliac crest is nature’s weight-bearing platform. When the hip belt sits here correctly, your pelvis and leg bones support the load rather than your spine and shoulders. This positioning allows you to maintain an upright posture and natural walking gait even with a heavy pack.
If the belt sits too high on your waist, it can’t transfer weight effectively and may restrict breathing. Too low, and it rests on soft tissue rather than bone, causing discomfort and poor weight distribution. The belt should feel snug but not tight—you should be able to slide a finger underneath when properly adjusted.
A properly positioned hip belt allows your shoulders to relax. Your shoulder straps should feel light, almost like they’re just keeping the pack close to your back rather than supporting significant weight. This is especially important on long South African hiking trails where you’ll be carrying your pack for 6-8 hours daily.
How to Tell if a Backpack is Too Big or Too Small
What are the warning signs of incorrect backpack sizing? A too-large pack will have shoulder straps that don’t rest properly on your shoulders, while a too-small pack forces your shoulders to carry most of the weight.
Signs your backpack is too large include shoulder straps that gap away from your shoulders, the pack body extending too far below your waist, or the hip belt sitting loose despite tightening. The pack may also sway excessively as you walk, throwing off your balance on technical terrain.
Conversely, a too-small backpack creates pressure points where the frame or stays dig into your back. The shoulder straps may pull downward uncomfortably, and you’ll feel the pack’s weight primarily on your shoulders rather than your hips. The hip belt might not close properly or sit above your iliac crest.
Adjustable suspension systems help bridge sizing gaps, but they have limits. Most systems offer 5-10cm of adjustment, which can accommodate different torso lengths within a size category. However, if you’re significantly outside a pack’s adjustment range, you’ll need a different size.
Modern backpacks often include fit indicators—measurement points or guides that help you determine proper adjustment. These visual cues take the guesswork out of fitting and ensure you’re getting the most from your pack’s design.
Is it Better to Size Up or Down a Backpack?
Should you choose a larger or smaller size when caught between measurements? Generally, size down if you’re close to the boundary between sizes, as most quality packs offer enough adjustability to accommodate minor differences.
A slightly smaller pack that’s properly adjusted outperforms a larger pack that doesn’t fit correctly. Modern suspension systems provide remarkable customisation—adjustable back panels, multiple hip belt sizes, and various shoulder strap configurations accommodate different body types.
South African hiking conditions favour precise fits. The varied terrain demands good balance and agility, both compromised by oversized packs. A well-fitted smaller pack also encourages smarter packing choices, keeping you within your prescribed weight limit.
Consider your intended use, too. Day hikers can often manage with slightly tighter fits, while multi-day adventurers need comfort over extended periods. Your hiking style matters—if you’re covering technical ground like the Chain Ladder on Table Mountain, a secure, close-fitting pack is essential.
Climate considerations are important in South Africa’s diverse environments. A pack that fits well allows better air circulation between your back and the pack, reducing overheating in the country’s often warm conditions.
How to Correctly Put on and Adjust Your Backpack
How should you put on your backpack for optimal comfort? Start by loosening all straps, then tighten the hip belt first before adjusting the shoulder straps and stabilisers.
Begin with the pack on a raised surface like a rock or log. This prevents strain when lifting heavy loads. Slip your arms through the shoulder straps with all adjustments loose. Stand up straight and position the hip belt on your iliac crest, then tighten it until snug but comfortable.
Next, adjust the shoulder straps. They should rest comfortably on your shoulders without gaps or pressure points. The connection point between strap and pack should sit roughly level with your shoulder blades. Tighten gradually until you feel the pack stabilise against your back.
The chest strap connects across your upper chest, typically 2-3 fingers below your collarbone. This strap prevents the shoulder straps from sliding outward, but shouldn’t restrict breathing. Adjust tension based on terrain—tighter for technical sections, looser for gentle paths.
Load lifter straps angle upward from the top of the pack to your shoulders. These fine-tune the pack’s centre of gravity, pulling the top closer to your back for better balance. Proper adjustment prevents the pack from pulling you backwards, especially important on steep descents.
Dynamic adjustment throughout your hike helps prevent fatigue and pressure points. Loosen straps briefly during rest stops to restore circulation, then retighten before continuing. This simple practice can greatly improve comfort on long hiking days.
Summary and Final Tips
Getting your backpack fit right makes all the difference between struggling through your hike and actually enjoying every moment on the trail. Spend some time getting familiar with your pack’s adjustment systems—you’ll be glad you did once you’re out there.
Today’s packs come with clever suspension systems that work with your body shape and hiking style, but they only work well if you know how to use them. Try out all the adjustments at home first, so you’re not fumbling with straps when you’re halfway up the mountain.
Check in with your pack’s fit as you hike, especially on longer adventures. Your body’s constantly changing throughout the day—you might add or remove layers, your hydration changes, and your muscles get tired—all of which affect how comfortable your pack feels.
Frequently Asked Questions
How often should I adjust my backpack during a long hike? Adjust your pack every hour or whenever you feel pressure points developing. Loosen straps during rest stops to restore circulation, then retighten before continuing. This prevents fatigue and maintains comfort throughout your adventure.
Can I use the same backpack size for day hikes and multi-day trips? Different trip lengths often require different pack sizes and features. Day hikes typically need 20-35L packs, while multi-day adventures require 50-70L or larger. The fit principles remain the same, but comfort becomes more critical for extended wear.
What should I do if my backpack doesn’t fit perfectly, but I can’t return it? Minor fit issues can often be resolved with aftermarket accessories like different hip belts, shoulder pad adjustments, or back panel modifications. Professional outdoor gear shops can suggest solutions, though major sizing problems usually require a different pack.
How can I tell if my back pain is due to a poor pack fit or just normal hiking fatigue? Pack-related pain typically occurs in specific pressure points where the pack contacts your body, appears early in the hike, and worsens over time. Normal hiking fatigue affects broader muscle groups and often improves with rest and stretching.
Should pack fit change based on the type of terrain I’m hiking? Basic fit principles remain constant, but you might adjust strap tensions based on terrain difficulty. Technical sections benefit from tighter adjustments for better stability, while gentle paths allow slightly looser settings for comfort. Always maintain proper hip belt positioning regardless of terrain.